

Beginner's guide to mastering wood carving techniques in 2025
Wood carving techniques allow you to transform plain wood into stunning art pieces. It’s more than just a hobby; it’s an ancient craft with a rich history. In 2025, wood carving is gaining even more popularity. Why is that? People are increasingly seeking eco-friendly and unique items. The demand for handmade products is growing by 4.3% each year. Tools like the D2-003 Customizer Engraving Pen make it easy to bring your designs to life. If you’re looking to try something enjoyable and relaxing, now is the perfect time to start.
Key Takeaways
-
Begin with soft woods such as balsa or basswood. These are simple to carve and boost your confidence.
-
Try basic tools like carving knives and chisels. Quality tools make carving simpler and give better results.
-
Practice often to feel more confident. Small projects help you get better and have fun.
Getting Started with Wood Carving Techniques
Starting wood carving might seem hard at first. But with simple steps, you’ll soon create amazing pieces. Follow these tips to begin your journey.
Picking Easy-to-Carve Woods
Choosing the right wood is very important for beginners. Balsa wood is a great choice to start with. It’s soft and light, so tools cut through it easily. This helps you practice and gain confidence without much trouble. Once you improve, try other beginner woods like basswood or pine. These are also easy to carve and easy to find.
Essential Tools for Wood Carving
Using the right tools makes carving easier and more fun. Here’s a list of tools you’ll need:
-
Chip carving knives: Best for small cuts and detailed designs.
-
Chisels and gouges: Help shape wood and remove big pieces.
-
V-tools: Great for adding tiny details and textures.
-
Mallets: Help control force when using chisels.
-
Flexcut carving tools: Work well for both beginners and experts.
Good tools last longer and give better results. Experts suggest buying high-quality ones.
Safety Tips for New Carvers
Staying safe is very important when using sharp tools. Follow these safety tips:
-
Use thumb guards to protect your hands.
-
Keep tools sharp. Dull tools need more force and can slip.
-
Always carve away from your body to avoid cuts.
-
Learn how to hold tools properly. This keeps you safe and improves your skills.
Tip: Take a wood carving class or watch online videos. You’ll learn safety and tool tips from skilled carvers.
By following these tips, you’ll start carving with confidence. Remember, practice often and be patient!
Basic Wood Carving Techniques for Beginners
Learning basic wood carving is a fun way to start. These methods help you make cool items while improving your skills. Let’s explore three easy techniques: whittling, chip carving, and relief carving.
Whittling: A Simple Way to Begin
Whittling is the easiest wood carving method. You only need a sharp knife and soft wood like basswood or balsa. This technique is great for carving small things like spoons, animals, or figurines. It’s perfect for beginners because it uses few tools and teaches control.
Why is whittling a good start?
-
It improves your hand and knife control.
-
Small projects help you gain confidence.
-
You can carve anywhere, indoors or outside.
In the past, whittling was common in rural areas for making useful items. Today, it’s a relaxing hobby that lets you be creative. Start with simple shapes and try harder designs as you get better.
Tip: Keep your knife sharp and carve along the wood grain. This makes smoother cuts and avoids splinters.
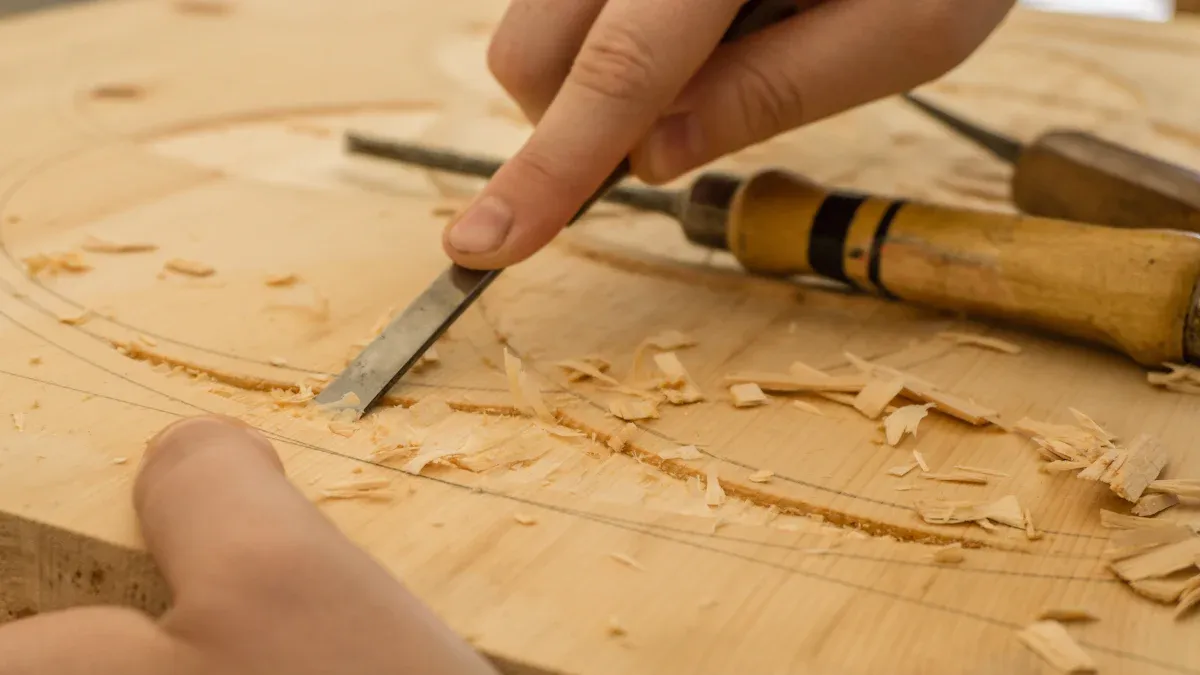
Chip Carving: Making Pretty Patterns
Chip carving is about cutting small chips to make designs. You can create patterns like flowers or shapes on boxes, plaques, or furniture. It’s a fun way to add decoration to your projects.
Why try chip carving?
-
It teaches clean and careful cutting.
-
You learn about symmetry and design.
-
You can make patterns that look amazing with light and shadows.
|
Design Idea |
What It Means |
|---|---|
|
Matching the Object |
|
|
Beginner-Friendly |
Needs only a few tools, so it’s easy to start. |
Many carvers find ideas for chip carving in nature or buildings. Begin with simple patterns and slowly try harder ones. Take your time to get better at this skill.
Note: Use a chip carving knife that feels good in your hand. This helps you stay in control and avoid tired hands.
Relief Carving: Making Designs Stand Out
Relief carving is when you carve into flat wood to add depth. It’s great for making signs, wall art, or panels. Unlike other methods, relief carving focuses on layers and textures.
What makes relief carving special?
-
It teaches you how to add depth to your designs.
-
You’ll use tools like chisels and gouges.
-
It’s a way to turn your ideas into art.
|
Study |
What It Found |
|---|---|
|
Xiaoli et al. (2010) |
Layers make designs look more interesting. |
|
Jayanthi et al. (2024) |
Texture adds realism to carved pieces. |
To start, draw your design on the wood. Carve the background to make the main parts stand out. Sand the surface to make it smooth and neat.
Pro Tip: Practice on scrap wood first. This helps you learn without ruining your main project.
By learning these three techniques, you’ll become better at wood carving. Each method has its own challenges and rewards, helping you grow while making amazing items.
Advancing to Intermediate Wood Carving Techniques
After learning the basics, you can try harder techniques. These intermediate methods let you make more creative carvings. Here are three fun ways to improve your skills.
Carving in the Round: Making 3D Shapes
Carving in the round means making sculptures you can see from all sides. Unlike flat designs, this method creates full shapes like animals or people.
Start with soft woods like basswood or butternut. These are easy to carve but strong enough to keep their shape. Use tools like chisels, knives, and gouges to slowly shape your wood.
|
Technique |
What It Does |
|---|---|
|
Power Carving |
Speeds up carving with electric tools. |
|
Carving in the Round |
Makes full 3D sculptures. |
|
Intarsia |
Combines wood pieces for colorful, mosaic-like designs. |
Tip: Turn your sculpture often to check its shape. This helps keep it balanced and realistic.
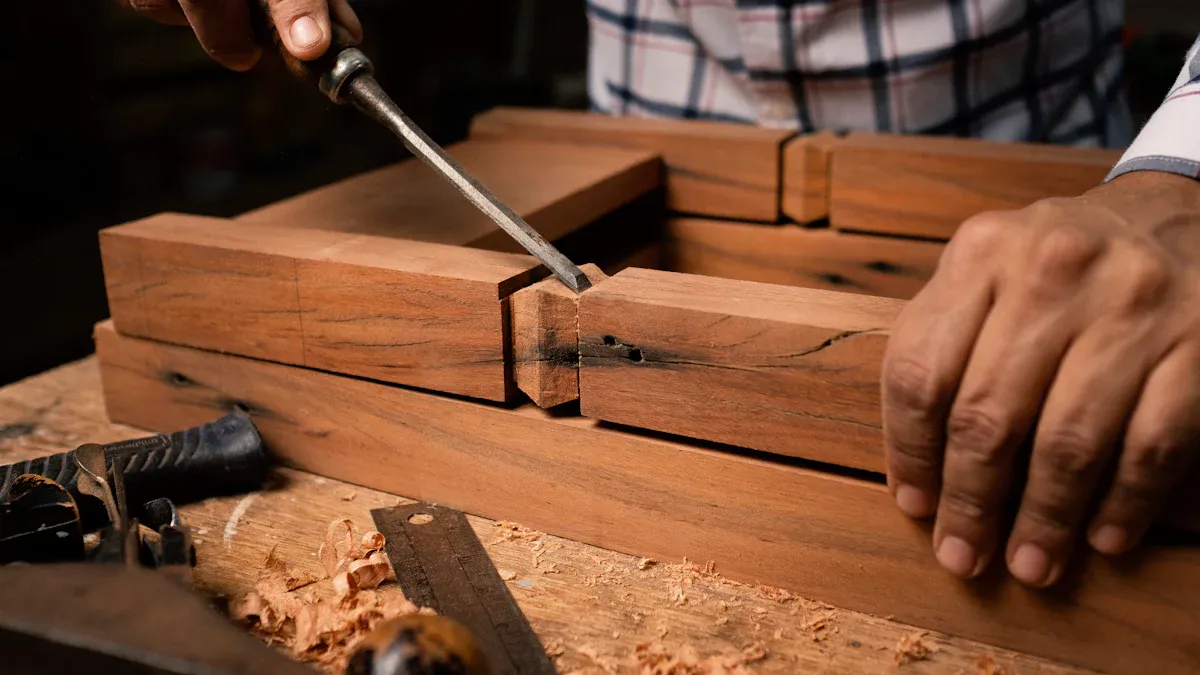
Using V-Gouges and Special Tools
V-gouges are great for adding small details like fur or patterns. They make clean lines that look sharp and neat. Other tools, like bent chisels, help you carve hard-to-reach spots.
Hold your tools firmly and carve slowly. Practice on scrap wood to learn how they work. Over time, you’ll get better at making precise cuts.
Pro Tip: Keep tools sharp. Dull tools can tear wood and ruin your design.
Sanding and Finishing for Smooth Results
Sanding makes your carving smooth and ready for finishing. Always sand along the grain to avoid scratches.
|
What It’s Good For |
|
|---|---|
|
Random-orbit sander |
Smooths large surfaces quickly. |
|
Hand-sanding |
Works well for edges and small areas. |
|
Belt-sander |
Levels glued wood panels. |
After sanding, add a finish like wax or varnish. This protects the wood and makes it look beautiful.
-
Sanding removes rough spots for a smooth surface.
-
Use different grit levels for better results.
-
Sanding with the grain hides scratches.
Note: Take your time sanding. A smooth surface makes your carving look professional.
These intermediate techniques help you grow as a carver. They build on what you’ve learned and let you create amazing, detailed pieces.
Tips for Mastering Wood Carving Techniques
Learning wood carving takes time and patience. Whether you’re new or improving, these tips can help you grow and enjoy the process.
Gaining Confidence with Practice
Confidence in carving grows with regular practice. The more you carve, the better you’ll get with tools and techniques. Start with small projects and slowly try harder designs.
Here’s how practice helps build confidence:
|
Practice Benefit |
Result |
|---|---|
|
Joining a carving group |
|
|
Getting advice from experts |
Finishes projects 30% faster |
|
Trying new tools and materials |
Boosts creativity by 25% |
|
Working in a friendly environment |
Lowers stress by 40% |
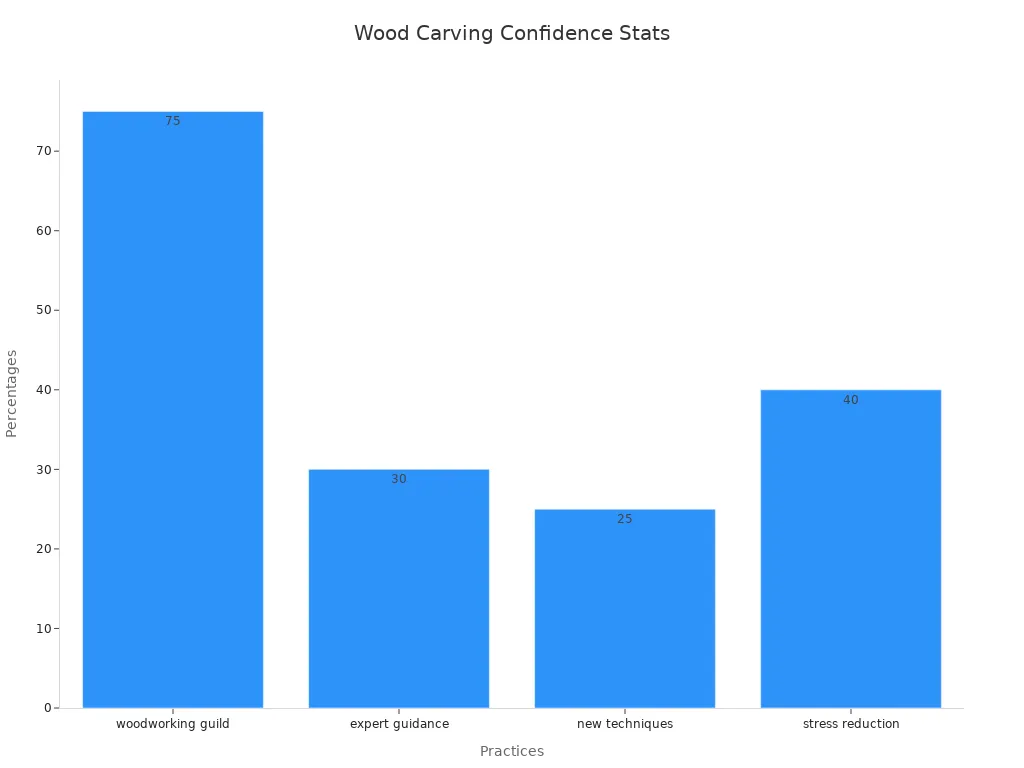
Tip: Write about your progress in a journal. Tracking your work helps you see how much you’ve improved.
Trying Different Styles and Projects
Exploring new styles and projects keeps carving fun. It helps you find what you like and boosts creativity. Experimenting also improves problem-solving skills.
Benefits of trying different carving styles:
-
You’ll feel proud turning wood into useful or pretty items.
-
Carving can help you relax and feel happier.
-
3D projects challenge your brain and keep it sharp.
-
You can make both practical things, like spoons, and artistic pieces, like statues.
Pro Tip: Mistakes are okay! Each mistake teaches you something new. Use scrap wood to test ideas before starting big projects.
Joining Wood Carving Groups
Carving doesn’t have to be done alone. Joining a group of carvers can inspire you and give helpful advice. Whether online or in person, being part of a community makes carving more enjoyable.
Why joining a group helps:
-
Learn new techniques from skilled carvers.
-
Sharing your work and seeing others’ ideas sparks creativity.
-
Groups often have events or challenges to improve your skills.
-
Support from others helps when you feel stuck.
Note: Find beginner-friendly groups where people are kind and helpful. A good group makes learning easier.
By practicing often, trying new styles, and joining a group, you’ll get better at carving and enjoy it more. Every project you finish brings you closer to your carving goals.
Wood carving techniques open up endless possibilities for creativity. With practice, you’ll see your skills improve and your confidence grow. Don’t be afraid to try new designs or tools. Every project you finish is a step closer to mastering this timeless craft. So, grab your tools and start carving today—you’ve got this! 😊
FAQ
What’s the best wood for beginners to carve?
Soft woods like basswood or balsa are ideal. They’re easy to carve and forgiving when you make mistakes.
How do I keep my tools sharp?
Use a sharpening stone or strop regularly. Sharp tools make carving easier and safer.
Can I start carving without expensive tools?
Absolutely! Begin with a basic carving knife and soft wood. Upgrade your tools as you gain experience.